Learn how to make paper flowers by hand or with an electronic cutting machine and enjoy the free paper flower templates below.
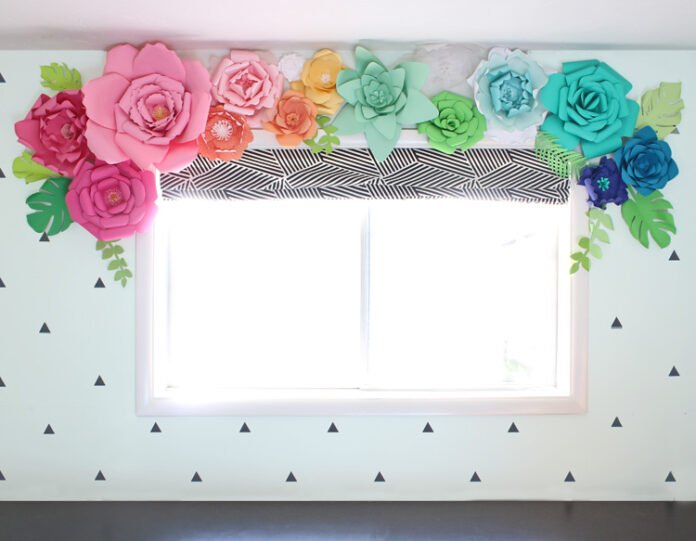
I made a rainbow of giant paper flowers to decorate my craft room and today I’m sharing the free paper flower templates and a tutorial for how you can make your own big, bold and beautiful paper flowers.

I can’t even tell you the pizzazz that these paper flowers add to my craft room and how much I’m in love. It is such a huge focal point in the room and I adore the bright colors and whimsical feel. My craft room is my happy place and these giant, colorful flowers really reflect that feeling.
Paper flowers are so fun to make, can be used in so many different ways and there are endless options for color combinations to match your decor style. Paper flowers make great decorations for weddings, baby showers, bridal showers and pretty mch every special occasion! And the best part is that the whole thing is made from nothing but paper and hot glue so they’re super affordable.

I went to Hobby Lobby and loaded up on cardstock in every color of the rainbow, literally. It takes 8 sheets of 8.5×11″ cardstock for the largest flowers shown and 3 sheets for the smallest flowers, so be sure you buy enough cardstock. Nothing’s worse than being one sheet of paper short and having to run back to the store in the middle of a project. I went when open stock paper and paper packs were all 50% off, so I feel like I scored big time.
How To Make Paper Flowers Step By Step
Making paper flowers is simple and so fun. All you need is paper, scissors and hot glue. You can use a Silhouette or Cricut machine if you have one, but cutting the petals out by hand is totally doable too. I created a video tutorial to show you exactly how to make them.
Paper Flower Video Tutorial
HOW TO MAKE PAPER FLOWERS WITH A SILHOUETTE CAMEO MACHINE
Materials Needed
- Free SVG Files (download below)
- Colored Cardstock
- Hot Glue Sticks
- Silhouette Cameo Machine
- Cutting Mat
- Hot Glue Gun
Instructions
- Download the paper flower templates below and import them into Silhouette Design Studio.
- Trace around the shapes and resize the flower petals to fit on the paper you’ll be using.
- Adjust cut settings for cardstock and send petals to be cut.
- Curl the edges of the flower petals around a pencil.
- Fold the bottom slit on top of itself and glue it into place.
- Glue the small petals onto a cardstock circle, then repeat for the medium sized petals and repeat again for the largest petals.
- Layer the three rounds of petals together and glue in place.
- Add a center decoration if desired.

HOW TO MAKE PAPER FLOWERS BY HAND
Materials Needed
- Free Printable Template (download below)
- Colored Cardstock
- Hot Glue Sticks
- Hot Glue Gun
- Scissors
Instructions
- Download the paper flower template below.
- Resize the petals on the computer if desired. Print.
- Cut out the flower petal templates. Trace onto cardstock and cut out with scissors. To speed up the process, you can cut through several layers of cardstock at a time.
- Curl the edges of the flower petals around a pencil.
- Fold the bottom slit on top of itself and glue it into place.
- Glue the smallest center petals onto a cardstock circle, then repeat for the medium sized petals and repeat again for the largest petals.
- Layer the three rounds of petals together and glue in place.
- Add a center decoration if desired.
For this particular display of paper flowers, I wanted a mix of big and small flowers with tropical greenery peeking out a bit, so I planned out which colors in rainbow order would be big and small, then mixed different flower shapes so there was plenty of variety.
It’s hard to tell in the pictures, but I found some really pretty pearlized paper at Hobby Lobby and used that for the lightest pink flower and the ombre aqua flower. It adds a subtle sparkle that I really love. I also bought a pack of vellum and created one entire flower from it. It basically disappears in pictures but is pretty in real life.

I’m even sharing the free paper flower templates for you to enjoy.
There are four files available. One file is for printing and cutting by hand and the other three are SVG files to use with a Silhouette or Cricut machine. The three SVG files are for easy paper roses, cabbage roses and peonies. You’ll see all four templates in the Google folder.
To get the templates, enter your email address right here:
GET THE FREE PAPER FLOWER TEMPLATES
Enter your email address below to receive access to the free paper flower templates.
[newsletter_form]
You will also be automatically subscribed to my newsletter, which means I might send you an email every couple of weeks with fun craft ideas and the latest DIY projects.
Now go check your email and you’ll see an email from me that will have a link to all the templates.
I also purchased
cut files from the Silhouette Design Store. It’s what I used for the flower centers. I just added the slits to the bottom of each flower petal to make them more 3D.
This was such a fun project. Each paper flower is a miniature work of art and watching the rainbow of flowers come together was really satisfying. It will inspire me every day as I’m in my craft room creating.
I mean, how could you not be inspired when you look up and see this?!

DIY PAPER FLOWERS: FREQUENTLY ASKED QUESTIONS
How do you attach the paper flowers to the wall?
I used thumb tacks hidden under a layer of petals. If you don’t want to put holes in the walls, the velcro-like Command strips would work well. I don’t recommend using tape unless the paper flowers will only be used as a short-term decoration. Tape tends to fall off with time.
What type of paper do you use to make paper flowers? What is the best material to make paper flowers?
Cardstock. I bought it in packs at Hobby Lobby because it was cheaper per page. You can use any kind of paper, but if you use flimsy printer paper, the flowers tend to be a little bit droopy, so I prefer cardstock. It doesn’t have to be a particular weight. This pack of
would work great.
How do I download the templates?
Enter your email address in the teal colored box above. You will get an email with the link to download the templates.
[newsletter_form]
What size do I cut out the petals?
Any size you want! You can adjust the sizes of any of the templates in Silhouette Studio or if you’re cutting the petals by hand, adjust the pattern on the computer before printing. You can adjust the size in software such as Paint, Photoshop, Illustrator, or PicMonkey.
As a reference, the largest flower in the photos is sized so that the largest outside petals fit ONE petal per 8.5×11″ sheet of paper. That’s a very large petal!
What size do I cut out the circle bases?
This isn’t an exact science… but as a starting point, if you’re making the largest size flower with one petal per 8.5″x11″ piece of paper, you’d need a circle that’s about 3 inches in diameter and progressively smaller circles for smaller sized flowers.
Where did you get the leaf patterns?
I purchased a cut file from Silhouette Design Store. They had a ton to choose from! If you are cutting leaves by hand, Google “jungle leaves” and print one out to use as a pattern.
I can’t open the free files. What’s wrong?
The number one reason people can’t access the files is that they are at work and their work server blocks access to Google Drive. This is especially true for school districts. Try opening the files again at home or from an unrestricted computer and see if that helps.
Aren’t these flowers a huge dust collector?
Not really. And when I notice they’re dusty, I spray them down with canned air (or blow air out of my shop vac), then vacuum the floor. Easy peasy!


